When I studied abroad during college, I went to Australia. Many of the other students ate meat pies, sausage rolls, and the like. I have to admit that I never tried one. They just never appealed to me... until yesterday.
I make a monthly menu every month so that I'll have an idea of something I can make every day of the month. But, I often veer away from that at the last minute. Yesterday was one of those days. I opened up America's Test Kitchen's Lost Recipes cookbook, an out of print ATK cookbook that I found at a book sale. I found a recipe for Runsas and thought it might be worth a try. My family ended up loving them!
They weren't as hard as they sounded, but having a breadmaker make the dough does help. I did forget the cabbage when I went to the store, though, so I substituted 4 oz. steamed spinach and 2 cups of carrots (sauteed) for the cabbage. I also substituted mozzarella for the American cheese. Two of my three kids had them for lunch today, which says a lot in my family!
Here's a link to the recipe for the Runsas... http://www.food.com/recipe/runsas-386848
My son has already asked me to make them again!
Tonight I attempted challah bread and Caribbean Black Bean Soup with Fruit Salsa. The challah was a salvaged disaster! The author of the bread cookbook hadn't doubled the recipe correctly and the dough came out of my bread maker as soup. Well, you win some and lose some! I pulled it out and dumped a ton of flour on it. Then, I had to add extra yeast dissolved in water with some sugar to it because the multiplication hadn't been done correctly. Then, more flour. My bread didn't turn out to be challah, but in the end it did turn out to be edible and I'm thankful for that. The soup was more of a success as two people at the table ate seconds and it will definitely be made again in the future. I couldn't find this recipe online, though, so I can't link to it...
I like making new dishes, but sometimes you never can tell how they're going to turn out!
Thursday, February 26, 2015
Tuesday, February 17, 2015
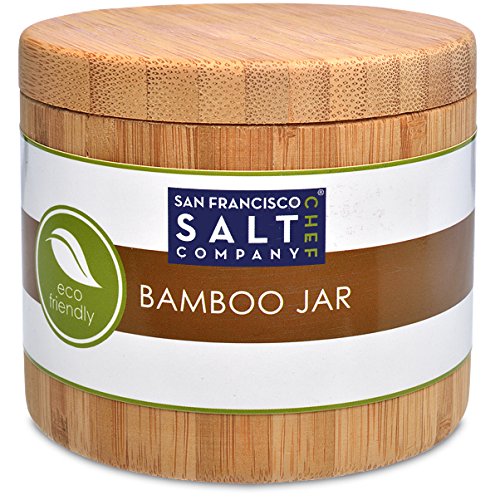
Salt Shaker Solution
I was recently sent a little bamboo jar for review. We are using it filled with salt on our dining room table.
Friday, February 6, 2015
Mashed Potatoes and Chicken with mushrooms and cream gravy
Last night I made a dinner my family all loved. Steamed green beans, cranberry sauce (from a can), mashed potatoes, and chicken with mushrooms and cream gravy.
My mashed potatoes were better than usual, but I did something different. I usually just throw things in, but I thought I'd actually try and put in measurements. So, here's what I put in.
Mashed Potatoes
Peeled, chopped, and cooked 2 1/2-3 lbs. of potatoes
3/4-1 tsp. minced garlic.
2 large spoonfuls of sour cream (probably 3-4 Tbsp.)
2 Tbsp butter
1/2 tsp. salt
1/4 tsp. pepper
2 large splashes of half and half on the pile of potatoes in my kitchen aid bowl (again probably 3-4 Tbsp.)
I mixed everything till smooth in my kitchen aid (as smooth as your family likes them). My kids were very happy with them. Yay! I'm going to try and be more exact on the sour cream and half and half next time ;) and then I'll come back and revise this.
I also tried a new recipe today from the Betty Crocker site for Chicken Breasts with Creamy Mushroom Gravy, but I modified it so much that it turned out very differently. The recipe on the site got only 3 1/2 stars, but my family would have given dinner tonight 5 stars! But... I changed it a ton.
So, here's what I made last night:
Chicken with Mushrooms and Gravy
2 very large chicken breasts = 1 1/4- 1 1/2 lbs. chicken breasts defrosted
1 cup flour
1 1/2 tsp baking powder
1/4 tsp salt
1 Tbsp butter
1/2 tsp garlic powder
1 egg
1/4 cup milk
8 oz. mushrooms, sliced
3 Tbsp. diced white onions
3/4 cup milk
1 cup chicken broth
1 1/2 tsp soy sauce
1 1/2 Tbsp butter
butter and canola oil
1. Cut the chicken breasts into pieces that you'd normally use for making breaded chicken sandwiches on a normal size hamburger bun. Then cut these pieces in half or thirds horizontally if they're really thick. Some I cut in half and some in thirds--to about 1/2 inch thickness. Place pieces flat (with room to spare) in gallon size ziploc bag. Use a mallet to pound the pieces to 1/4 inch thickness. I have a mallet like this one:
I've read that people can even use the rubber mallet you use for working around your house--just be sure to disinfect it with white vinegar afterwards because invariably, the chicken breaks through the bag. After I've pounded the chicken, I cut it into the size pieces I want to be a serving size of 1-2 pieces per person. Then, I place the chicken in a bowl next to my stove and move on to the next step.
* After pounding the chicken and setting it aside, I use white vinegar and a paper towel to disinfect my countertop where I was working by pouring a little vinegar on the counter and then rubbing it all over.
2. Beat the egg and milk in a bowl together and place next to the chicken.
3. Place flour, baking powder, salt, and 1 Tbsp butter in a bowl. But the butter into the mixture until it disappears and you don't even know it's there. I don't use a pastry blender for this. I just use my fingers and squish over and over until it's all mixed in. Place flour in a bowl next to the egg. Set 1/4 cup aside in a measuring cup for the gravy later.
4. Heat 1 Tbsp butter and 1-2 Tbsp canola oil in large skillet (I use my cast iron one) over medium heat . When butter is melted, dip the chicken first in the egg mixture and then coat in flour mixture and place in pan. Cook over medium heat for 5 minutes on each side--this depends on your stove and your pan. Watch it. It should be a nice golden brown on each side after 5 minutes. It took me two rounds to cook all of my chicken. Set aside chicken on a plate.
5. While my chicken was cooking, I threw my mushrooms and onions with 1 Tbsp butter in a nonstick fry pan and cooked over med-high heat so that they would cook quickly and nicely. Medium-high lets them cook through but not get soggy, just watch them so they don't burn. If you think they're cooking too fast, just turn it down to medium for a few minutes. This probably takes about 8 minutes or so. Once cooked, set aside in a small dish with a lid to keep them warm.
6. When the chicken is done, add 1 1/2 Tbsp of butter to the pan and let it melt, then stir in the 4 Tbsp of flour mixture that you'd set aside until it absorbs the butter. Then, add the chicken broth little by little. Whisk as you go so that it's all absorbed. Pour in about a quarter cup at a time. There are lumps at first, so keep stirring till all absorbed and add 2 Tbsp at a time if that makes it easier. If you add too much, you will need to let your gravy come to a low boil/simmer so that it can thicken up. It will thicken, but it will take time. After finishing adding all the chicken broth, add the soy sauce. Then, add the milk a few Tbsp at a time until you've added about 3/4 cup. You can add less if you want it thicker or don't need as much gravy.
7. I served steamed green beans and cranberry sauce on the side. I placed a mound of mashed potatoes on each plate along with a piece or two of chicken. We topped the chicken with some mushrooms/onions for those in our family who liked them and then put some gravy over top. My middle daughter doesn't like gravy, so having the elements of this meal separate makes things more edible for her.
So, that's my recipe... My husband has declared that it's a keep and is one that we'll definitely make for company soon!
Subscribe to:
Posts (Atom)