A while back, I posted the recipe I used to make pork tacos. A friend made it and it didn't turn out as she had hoped. Her cooking experience made me realize a few things that would be wise to mention...
For the pork taco recipe, I would recommend adjusting the amount of sauce to how much meat you cook. With BBQ pork, I like to have lots of sauce, but with pork tacos, you want enough to give it flavor, but not make it "saucy". I have to admit that I cook by how things look. I am not a very exact cook. I throw things together and make adjustments as needed. I recommended starting with 1/2 a recipe of sauce, but if that seems like it will be a lot (mix the sauce outside of the pan where the pork is), then only add part of what you've made.
When I post a recipe, I try to note all of the changes I've made, but my meat measurements are approximate-- My mom told me that it's because I was a camp cook (and head cook) for 4 summers, worked at a deli, and then at a restaurant. I do things fast. That's my goal. It's been my primary goal for the past 9 years since my first daughter was born. There's always something else that needs my attention when I'm cooking--besides my cooking!
Here's another example of how I cook. It was interesting to watch my husband cut the pork for mu shu last Saturday night. He was precise and accurate. Every piece of pork and chicken was exactly the same, slender size. This is is how he and I are different. I joked with my mom afterwards about how I would have done it. chop chop chop chop chop chop chop chop chop--- quick and fast. The pieces wouldn't have all been the same size or thickness, but it would have worked. I appreciate my husband very much and admire that he enjoys cooking this way.
It's just different than me.
I thought I'd explain this for future reference in case one of my recipes that I post doesn't turn out as you'd hoped. Comment or please email me--I like to share my recipes, but I want them to work!
Thursday, December 27, 2012
Wednesday, December 19, 2012
Paper Flowers
The daughter of a friend of mine is having paper flowers for her wedding bouquets. I hadn't heard of these, so I looked them up. There's all sorts of ways to make them. They really are quite pretty!
My mom is moving into her own apartment in 2 weeks and she needs a decoration for the little shelf outside her door, so I thought of the paper flowers when I found a small yellow bucket downstairs. Here's how they turned out:
 I learned several things from this project.
1) They can be fun to make. Here's the page I used for directions... http://jonesdesigncompany.com/flowers/rolled-paper-flowers-tutorial/
2) These are NOT for kids to make. The hot glue burned me several times and it really hurt! I've used hot glue a lot over the years, but because of how these had to be glued together at the end and how the leaves had to be glued, I got burnt several times.
3) Trying to do crafts when you have kids walking around is different than when you can do them while your kids are napping or asleep at night. I felt a lot of pressure to get this project done as quickly as I could. Having to hold the flowers, leaves, and stems in place took time and tied up my hands. I finally realized that wooden clothespins helped me with the leaves so I could let them sit without me having to hold them together one by one.
4) Paper flowers are a fun, inexpensive decoration. My mom is big about being frugal--she is the most frugal person I know. So, I wanted to make her a fun, cute decoration that would only use craft supplies that I already have on hand.
It was fun to try a new craft!
My mom is moving into her own apartment in 2 weeks and she needs a decoration for the little shelf outside her door, so I thought of the paper flowers when I found a small yellow bucket downstairs. Here's how they turned out:

1) They can be fun to make. Here's the page I used for directions... http://jonesdesigncompany.com/flowers/rolled-paper-flowers-tutorial/
2) These are NOT for kids to make. The hot glue burned me several times and it really hurt! I've used hot glue a lot over the years, but because of how these had to be glued together at the end and how the leaves had to be glued, I got burnt several times.
3) Trying to do crafts when you have kids walking around is different than when you can do them while your kids are napping or asleep at night. I felt a lot of pressure to get this project done as quickly as I could. Having to hold the flowers, leaves, and stems in place took time and tied up my hands. I finally realized that wooden clothespins helped me with the leaves so I could let them sit without me having to hold them together one by one.
4) Paper flowers are a fun, inexpensive decoration. My mom is big about being frugal--she is the most frugal person I know. So, I wanted to make her a fun, cute decoration that would only use craft supplies that I already have on hand.
It was fun to try a new craft!
Monday, December 17, 2012
No-Cook Fudge
This weekend I made fudge for the first time. Fudge has always been my favorite when it comes to Christmas treats. But, I've never made it. I've been intimidated by the soft boil/candy making. So, this year I tried two different recipes. The first was called Easy Fudge. It involved stirring on the stove for a full 5 minutes at a full boil... The second recipe was titled "No-Cook Fudge". I really expected the one that required a lot of work to be the recipe I preferred. But... I was wrong!
My family all agreed that the no-cook fudge was really, really good! It was just what I love about fudge. Creamy, rich, and chocolatey. So, here's the recipe I used. I found the same recipe I used on Cooks.com
NO COOK FUDGE
1/2 c. butter
1/3 c. water
4 1/2 c. powdered sugar (sift!)
1/2 c. nonfat dry milk powder
1/2 c. unsweetened cocoa powder
dash of Salt
Stir butter into boiling water. Stir until melted. If it doesn't completely melt, put in the microwave for 15 seconds. Beat in powdered sugar, dry milk, cocoa powder and dash salt. I mixed it well in my stand mixer. Pour into buttered (or pan sprayed with cooking spray) 8 x 8 x 2 inch baking pan. I prefer pyrex for it. Refrigerate several hours. Cut into squares. Makes 3 dozen 1 inch pieces.
One thing that I especially loved was that my son (4 1/2 yo) was able to help me by sifting the sugar.
I am so glad to have finally found an easy fudge recipe!
Wednesday, December 12, 2012
Baked Oatmeal Recipe
Last week at the women's Christmas brunch at our church, one gal made baked oatmeal. I like the recipe because it's easy to make gluten free and super yummy... Note to gluten free folks, I read online that you have to get rolled oats that specify that they are gluten free if you have a severe allergy. Quaker Oats doesn't guarantee that their oats have not experienced cross-contamination and can't be considered gluten free :( But, I read that there are oatmeal brands that certify that their oats are gluten free and have been processed on gluten free equipment.
Baked Blueberry Oatmeal
3 cups rolled oats or old fashioned oatmeal
1/2 cup brown sugar
1/4 cup honey
2 heaping tsp. baking powder = 2 1/2 tsp. baking powder
1/2 tsp. salt
2 eggs
1 cup milk or 1 cup rice milk
1/2 cup vegetable oil
1/2 tsp of vanilla
1 cup frozen blueberries
1/2 cup finely chopped pecans
Combine all ingredients in mixing bowl. Stir and pour into square 8 x 8 pyrex baking dish. Pour frozen blueberries over top and spread out. Press blueberries lightly into the top. Bake at 350 for about 40 minutes. Test with spoon in middle to see if done. The middle shouldn't be wet.
My husband loved it and my kids liked it too, so this is sure to become a regularly made dish in our house.
My husband, of course, liked it topped with whip cream!
Sunday, December 9, 2012
Italian Red Sauce
It took me 12 years of being married to an Italian, but I finally came up with a red sauce for pasta that my husband loves.
Here it is:
First brown 1 lb. of italian sausage (I like sweet, mild for my family) cut into 4 inch lengths in a skillet. Once browned, put into large crockpot.
Then, start on the meatballs.
Mix:
Meatballs
2/3 cup bread crumbs
1/2 cup buttermilk or 1/2 cup milk + 1 tsp. lemon juice (let sit for 5 min. to sour)
1 lb. ground beef
1/2 cup grated Parmesan cheese
2 tsp. dried parsley leaves
1 large egg yolk
1 small clove garlic , minced (1/2 teaspoon from a jar)
3/4 teaspoon salt
Mix bread crumbs and buttermilk/sour milk together for 5 min. and let sit. Then, add rest of ingredients and form into meatballs (some people like small and some like large). Brown meatballs on all sides in a skillet with 1/4-1/2 inch canola oil. You don't need to cook the meatballs through. Once browned, place in crockpot with sausage.
Sauce:
Saute 1 large onion and 3 cloves of garlic (minced) with 2 Tbs. olive oil., then add to crock pot.
Add 1 29 oz. can crushed tomatoes, 2 29 oz. cans tomato puree, and 1 can of water (add less if you like a thicker sauce)
Add 2 tsp. oregano, 2 tsp. sugar, 2 tsp. salt, 2 tsp. basil, 1/2 tsp. black pepper, and a handful of fresh chopped parsley to the sauce (or 2-3 tsp. dried parsley).
Add 1/3 cup red wine if you enjoy red wine in your sauce. My kids don't like wine, but my husband does, so I usually opt for 1/4 cup and meet them in the middle.
Let sauce cook in crockpot on high for 4-6 hours. The sausage and meatballs will cook through in the sauce.
So, that's my sauce recipe :)
Cannoli
Yesterday, for our church's Christmas brunch, I made cannoli. It was actually my first attempt, but they turned out well! Yippee! So, here's what I did.
There are two ways of making cannoli shells. You can make the dough, use a form, and fry them. OR you can make pizzelle cookies and roll them around a wooden dowel to shape them. I opted for the second way.
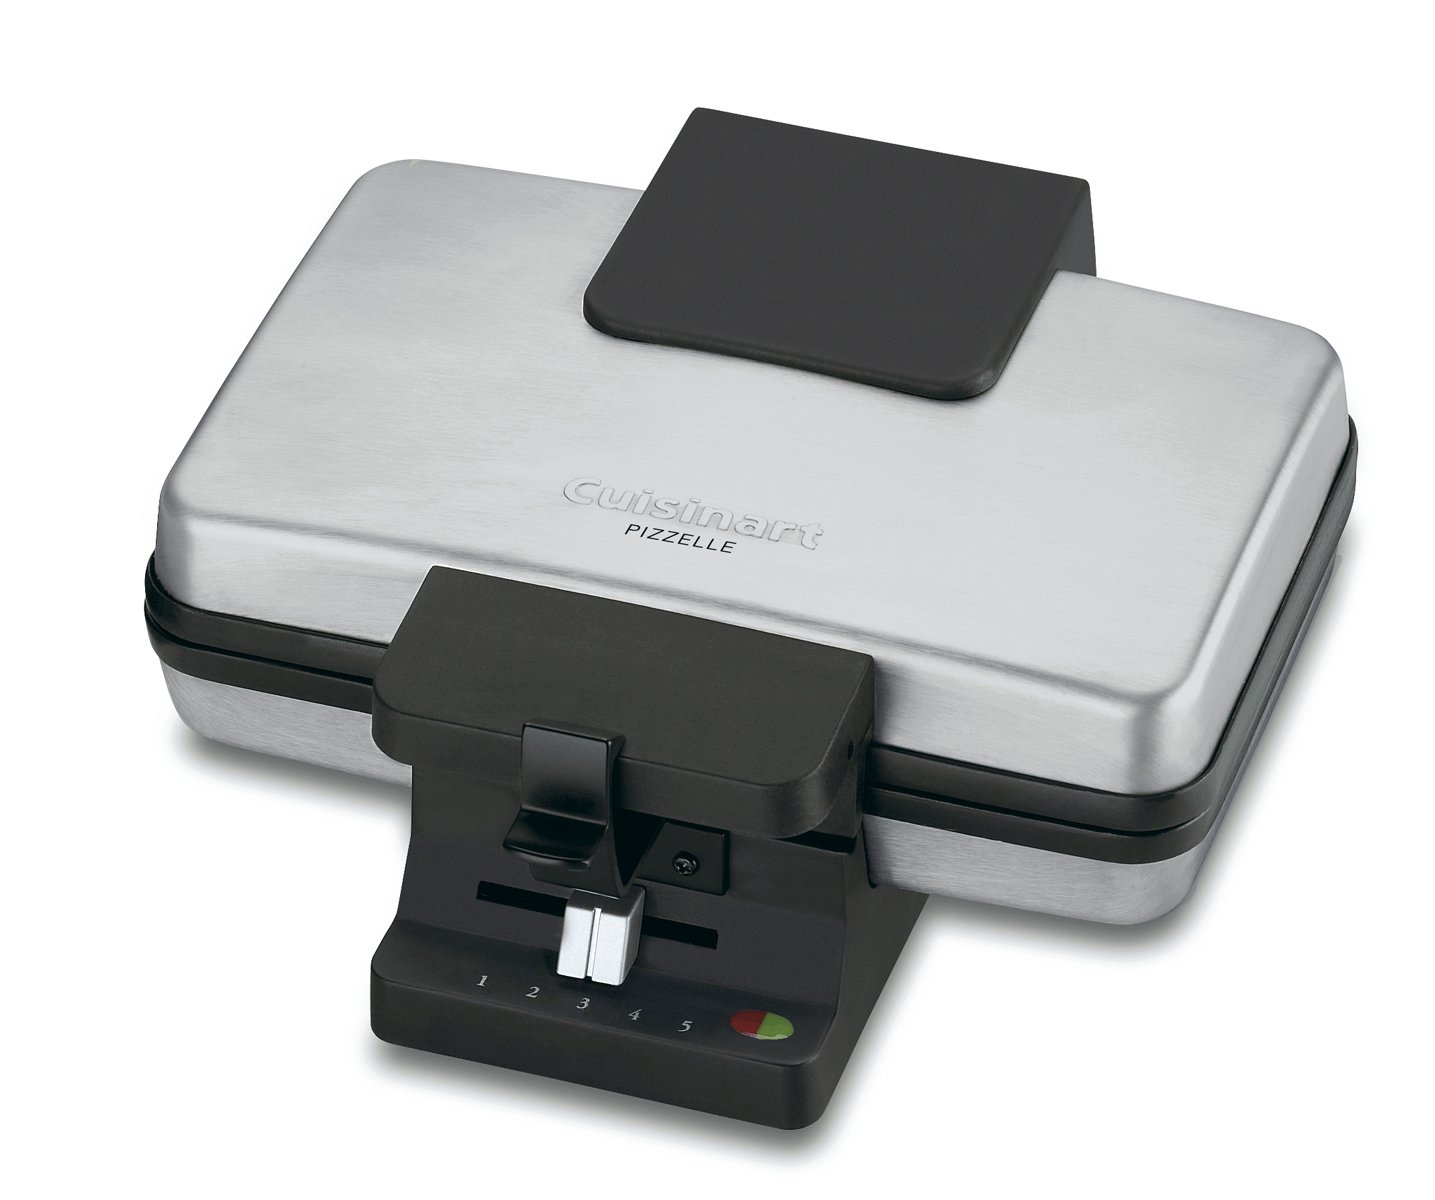 I have two pizzelle makers. I bought a cuisinart pizzelle maker 7 years ago. The clasp quickly broke off, but it has continued working. Last year, I bought a Chef's Choice Pizzelle maker. It makes 3 smaller pizzelles at a time. The Cuisinart makes 2 larger ones. I thought I would love the newer one, but I found that neither one works better than the other. I still have to spray them both before each pizzlle with cooking spray.
I use the Pizzelle recipe that came in the manual with the cuisinart maker.
This recipe is almost the same:
http://allrecipes.com/recipe/pizzelles-iii/
When the pizzelles are done, the green light goes on. I set my machine to 3. It makes a light colored pizzelle. I take one of with a fork and gently roll it around the dowel. I lean it against the black base of the maker. Then I take the other one off and wrap it around a second dowel and lean it against the other side of the pizzelle maker. Then, I spray the maker and start another 2 pizzelles. After about 30 seconds, I gently slide the dowels out and move the cannoli shells off to the side (I put them in a rectangular tupperware that I have).
I made the filling using this recipe:
CANNOLI FILLING
1 lb. Ricotta
2 c. powdered sugar (1 c. if you don't want the filling super sweet)
1/2 tsp. vanilla
3/4 c. mini chocolate chips
8 oz. cool whip
Mix ricotta, powdered sugar and flavoring. Beat well. Add mini chocolate chips. Fold cool whip into mixture. Store the mixture in the fridge until you're ready to fill the cannolis.
I filled the cannolis right before we ate them. At first, I used a Wilton pastry tube contraption, but the chocolate chips got stuck. So, then I switched to a plastic bag--sandwich size. Put the filling in the bag and seal. Snip off one corner and squeeze filling out of the bag into cannolis.
Voila! Cannolis :)
There are two ways of making cannoli shells. You can make the dough, use a form, and fry them. OR you can make pizzelle cookies and roll them around a wooden dowel to shape them. I opted for the second way.
I use the Pizzelle recipe that came in the manual with the cuisinart maker.
This recipe is almost the same:
http://allrecipes.com/recipe/pizzelles-iii/
When the pizzelles are done, the green light goes on. I set my machine to 3. It makes a light colored pizzelle. I take one of with a fork and gently roll it around the dowel. I lean it against the black base of the maker. Then I take the other one off and wrap it around a second dowel and lean it against the other side of the pizzelle maker. Then, I spray the maker and start another 2 pizzelles. After about 30 seconds, I gently slide the dowels out and move the cannoli shells off to the side (I put them in a rectangular tupperware that I have).
I made the filling using this recipe:
CANNOLI FILLING
1 lb. Ricotta
2 c. powdered sugar (1 c. if you don't want the filling super sweet)
1/2 tsp. vanilla
3/4 c. mini chocolate chips
8 oz. cool whip
Mix ricotta, powdered sugar and flavoring. Beat well. Add mini chocolate chips. Fold cool whip into mixture. Store the mixture in the fridge until you're ready to fill the cannolis.
I filled the cannolis right before we ate them. At first, I used a Wilton pastry tube contraption, but the chocolate chips got stuck. So, then I switched to a plastic bag--sandwich size. Put the filling in the bag and seal. Snip off one corner and squeeze filling out of the bag into cannolis.
Voila! Cannolis :)
Monday, December 3, 2012
Figuring Out Photoshop
Nine months ago, we purchased Photoshop. The whole kit and caboodle. As a homeschooler, you can purchase Photoshop for a third of the cost through Adobe's website directly. Lightroom and Photoshop Elements are also reduced. I think the cheapest way to get elements, though, is when BJs or Costco has a coupon for it. I've seen it for as low as $50 there. I wish now that I had started with Elements or Lightroom. I have been using Google's Picasa program to edit my photos. It's free and super easy to use. You can download it here if you're interested: Google Picasa
Last summer I met a woman at one garage sale who was pretty snooty about photography to me. But, I still wanted to glean from her what I could. She spoke of Elements so poorly that I was convinced that the only option was to get the whole Photoshop program.
There's two ways of approaching photography:
1) to take the picture you want with your camera. To develop your understanding of aperture, speed, white balance, etc...
2) to use auto settings and a photo editing program to give your photos the effects you want.
Then, there's a middle road. I strive for #1, but use #2 when I have to along the way. I'm learning. Many of my pictures need to be cropped, straightened, or lightened. So, that's where photo editing software comes in.
Picasa has worked great for me. I still use it. I have started to play around with Photoshop when I have time--it really takes a lot of time to learn how to use it. Many people learn via youtube--which has been highly recommended to me as a way of learning how to use Photoshop. My way of learning something is to use books. So, I requested two books for review on the new version of Photoshop--CS6.

The first book is The Missing Manual, by Lesa Snider. During college, one of my professors told me that I wrote reports that would win the "throw them down the stairs" contest. This contest said that the ones that went the farthest were the best. Of course, this was a joke, but what he meant was that my group was very thorough. That's exactly what I'd say about this book. It would definitely win that contest, because it's a thick, thorough book.
This book covers absolutely everything. I have to admit that after reading the first two chapters and having no experience with Photoshop, I set it down. I was completely overwhelmed and doubted if I could ever learn how to use this program. After a few months of simply playing around with the program once in a while and using another book, I opened it back up. Now, it makes a lot more sense to me. If I want to really get good at Photoshop, this book would help me do that. It starts from the ground up and builds skills on top of each other. The writer does make it as interesting she can--this is a computer manual after all. I chuckled at the first chapter and smiled. The illustrations are from a PC version, but she regularly makes notes about the differences for mac and pc users. Photoshop is a very complicated program that requires a lot of skill. My brother in law told me that you can never fully know how to use all of Photoshop. Would I recommend this book? Definitely. Take a look at it if you're looking for a book that will cover everything.

The second book I requested was the Top 100 Simplified Tips and Tricks for Photoshop CS6 by Lynette Kent. This is a shortcut book. I thought I'd be able to simply pick it up and use it to do what I wanted since I was overwhelmed by The Missing Manual. Nope. Not the case. I had to play around a bit and feel comfortable getting out of the shallow end. Then, last week a friend came to me with a project and I used this book to edit a picture she gave me. I opened up the index and found the topic I was looking for. I followed the directions step by step and successfully edited the picture. I also attempted to do one thing that didn't work. What I love best about this book is the illustrations. Each numbered step is labeled on the diagrams. It was so easy to follow.
After working on that project and realizing I need more time on the basics, I have decided to go back to The Missing Manual when I have time and begin trying to work through it bit by bit. I think Photoshop is a little like cooking. If you haven't cooked much, it would be difficult to jump right into making a hollandaise sauce. But, you can practice with the whisk over time and get better at making gravies and sauces. But, if at the same time, you pull out a cookie recipe and it turns out well, you'll feel hopeful. Having something come out right encourages us that eventually we'll be able to cook the harder recipe, too.
Photoshop is that way for me. I've taken some baby steps, but I fear I have a hundred miles to go before I'm competent in the program. But, I'm hopeful.
Please note that I received complimentary copies of these books for review from O'Reilly publishing and John Wiley and Sons Publishing.
Last summer I met a woman at one garage sale who was pretty snooty about photography to me. But, I still wanted to glean from her what I could. She spoke of Elements so poorly that I was convinced that the only option was to get the whole Photoshop program.
There's two ways of approaching photography:
1) to take the picture you want with your camera. To develop your understanding of aperture, speed, white balance, etc...
2) to use auto settings and a photo editing program to give your photos the effects you want.
Then, there's a middle road. I strive for #1, but use #2 when I have to along the way. I'm learning. Many of my pictures need to be cropped, straightened, or lightened. So, that's where photo editing software comes in.
Picasa has worked great for me. I still use it. I have started to play around with Photoshop when I have time--it really takes a lot of time to learn how to use it. Many people learn via youtube--which has been highly recommended to me as a way of learning how to use Photoshop. My way of learning something is to use books. So, I requested two books for review on the new version of Photoshop--CS6.
The first book is The Missing Manual, by Lesa Snider. During college, one of my professors told me that I wrote reports that would win the "throw them down the stairs" contest. This contest said that the ones that went the farthest were the best. Of course, this was a joke, but what he meant was that my group was very thorough. That's exactly what I'd say about this book. It would definitely win that contest, because it's a thick, thorough book.
This book covers absolutely everything. I have to admit that after reading the first two chapters and having no experience with Photoshop, I set it down. I was completely overwhelmed and doubted if I could ever learn how to use this program. After a few months of simply playing around with the program once in a while and using another book, I opened it back up. Now, it makes a lot more sense to me. If I want to really get good at Photoshop, this book would help me do that. It starts from the ground up and builds skills on top of each other. The writer does make it as interesting she can--this is a computer manual after all. I chuckled at the first chapter and smiled. The illustrations are from a PC version, but she regularly makes notes about the differences for mac and pc users. Photoshop is a very complicated program that requires a lot of skill. My brother in law told me that you can never fully know how to use all of Photoshop. Would I recommend this book? Definitely. Take a look at it if you're looking for a book that will cover everything.
The second book I requested was the Top 100 Simplified Tips and Tricks for Photoshop CS6 by Lynette Kent. This is a shortcut book. I thought I'd be able to simply pick it up and use it to do what I wanted since I was overwhelmed by The Missing Manual. Nope. Not the case. I had to play around a bit and feel comfortable getting out of the shallow end. Then, last week a friend came to me with a project and I used this book to edit a picture she gave me. I opened up the index and found the topic I was looking for. I followed the directions step by step and successfully edited the picture. I also attempted to do one thing that didn't work. What I love best about this book is the illustrations. Each numbered step is labeled on the diagrams. It was so easy to follow.
After working on that project and realizing I need more time on the basics, I have decided to go back to The Missing Manual when I have time and begin trying to work through it bit by bit. I think Photoshop is a little like cooking. If you haven't cooked much, it would be difficult to jump right into making a hollandaise sauce. But, you can practice with the whisk over time and get better at making gravies and sauces. But, if at the same time, you pull out a cookie recipe and it turns out well, you'll feel hopeful. Having something come out right encourages us that eventually we'll be able to cook the harder recipe, too.
Photoshop is that way for me. I've taken some baby steps, but I fear I have a hundred miles to go before I'm competent in the program. But, I'm hopeful.
Please note that I received complimentary copies of these books for review from O'Reilly publishing and John Wiley and Sons Publishing.
Saturday, December 1, 2012
Affordable Treats
When the Christmas season comes, I expect my food budget to increase. But, I try to moderate this increase. I choose cookies that involve more work than cost. I am careful about when I use nuts (an expensive ingredient) because not everyone likes them. I make a variety of cookies and don't make all chocolate chip ones.
Today I was pondering what snack to make to take to a gathering. I found a very affordable one to make. I realized that sometimes I make cookies because I want people to think I'm a good baker--I know this is prideful and totally silly!! Once this occurred to me, I decided to make something I thought other people wouldn't make, but that would give variety.
I made the snickerdoodle chex mix. Here's a link to the recipe: Snickerdoodle Chex Mix
I did substitute Rice Chex and Kix for the cereal, because that's what I have. It's a simple and quick snack to make.
My experience with Food Processors
On Black Friday each year, I usually find myself shopping for myself and my family--not for other people. It's a great time to get kitchen appliances and clothes. I like to get gifts for people that are personal and that usually means buying things that aren't on sale or don't go on sale. Clothes, at least for me, are hard to buy for other people (except for my husband).
So, this year, I had 2 appliances I was looking for. A food processor and a toaster oven. I scoured the ads and finally found what I was looking for. A cuisinart 7 cup food processor for $68 at Macy's (best regular price is $100 on Amazon) and a Black and Decker Toaster oven for $20 (regularly $45 on Amazon).
Food Processors: Here's my story.
16 years ago, I had a tiny 1 cup food processor/chopper and a 7 cup cuisinart food processor. Both were given to me by my father because he didn't want them. He wanted the big one--12 or 14 cup capacity. I found that I only used the 1 cup chopper on rare occasions. The cleaning it required wasn't worth the effort it saved. I did use the 7 cup often, though. I used it for salsa, chopping, shredding carrots and cheese, making hummus... A few years ago, I thought I really wanted a larger one--12 cups. So, I handed down my 7 cup to a friend (I'd given the smaller one to someone years before) and saved up for the larger one. I purchased a kitchenaid one though because it was a better price and I was able to open the bowl. I couldn't figure out how to open the cuisinart bowl for some reason.
A year later, my husband got me a vitamix. I loved it and it meant I didn't need my blender anymore. My husband was convinced that it meant I didn't need my food processor either. So, I passed it on to a loved one. I made do. I learned how to make bread crumbs in my Vitamix (though it took a lot ! longer) and haven't made a carrot cake in a long time. I also stopped buying chunks of mozzarella because they don't shred as well by hand. I stopped making hummus for my husband. I made less salsa the past two summers.
Then, a few weeks ago, a gal at church mentioned chopping carrots for carrot cake in her food processor. I prefer to use the grating disc and grate them because of the texture. But, it made me stop for a moment and think of all the things I've stopped making the past three years ago with the arrrival of my Vitamix. So, I decided to use my allowance and save up for a new food processor.
I started looking around. I looked at less expensive brands, but the grating disks were plastic with a small metal portion for the grater and/or they combined disks and/or the food processor blade wasn't reinforced well. I'd had experience with bad blades because the old style mini chopper by cuisinart constantly came apart on me, which is one reason I only rarely had used it. I looked at a new model recently and they've improved the design. So, I went back to looking at cuisinarts and resolved to save up for the size I wanted.
I do love my Vitamix and I'm very thankful for it, but it can't completely take the place of a food processor. It definitely takes the place of a blender though, because it is one!
Food Processors are one of those things that go along with my theory--middle of the road is best. I often want the biggest--kitchenaid, toaster oven, blender, etc. But, it's not the best choice. The largest kitchenaid (575 watts) still rocks and doesn't do any better than my 375 watt did. I didn't need the largest food processor--12 cups. A 7 cup is great. I like using it and it takes a lot less space on my counter. So, if you're thinking about getting one, I'd look in the middle. :)
Subscribe to:
Comments (Atom)